|
PICC
Placement |
|
Procedure
Guidelines |
|
For
Qualified Healthcare Professionals |
PICC:
Peripherally Inserted Central Catheter By
Orhan
Konez, MD, Vascular & Interventional Radiology |
|
* |

 |
|
PICCs: 1st
photo shows a 5 Fr. Single Lumen PICC and the 2nd photo shows a
Double Lumen PICC |
|
|
 |
|
Typical
Procedure Table:
These
are the items needed for PICC. High-resolution (at least 5
MHz) ultrasound probe (with a sterile cover), micropuncture
needle (20-21g needle), small wire (0.018 inch), peel-away
sheath, PICC (peripherally inserted central catheter), small
blade, skin preparation solution, suture (2.0)
or butterfly for securing the catheter to the skin. |
|
| Checking
the arm veins with US: The patient is positioned on the procedure table and the arm
is positioned (right or left depending on the
interventionalistís desire and clinical setting) (e.g., If
there is a breast cancer history on one side, the other arm is
selected). |
|
 |
|


|
|
Ultrasound of the arm shows a vein. It is important not to compress the
tissue much with the US
probe; otherwise, the veins may disappear!
Slight
compression over the vessels help to distinguish the veins
from arteries. With slight compression, the veins appear
compressed and pulsation of the artery becomes more
noticeable. Important to remember: if the vein is thrombosed,
it becomes noncompressible! The second
US
image is with slight compression. |
|
|
|
|
| Prepping the
arm: Try to prep the arm all the way around.
Place a tourniquet as high as possible.
Which
arm veins should be used ?
The
larger the vein, the better; the basilic vein is the
ideal vein. It is a good approach to attempt to obtain access
as distally as possible, just above the elbow, in case you need
multiple attempts |
|
Obtaining
Access into the Vein: Ultrasound
probe is positioned transverse, and the needle entry point
just 1-2 cm distal to the US
probe, angled slightly towards the probe. Some advocate using
longitudinal positioning of the probe, but it makes it quite
difficult to place the needle and the vein on the same plane.
However (if ever needed), when the vein is entered, to confirm
the needle position, longitudinal positioning of the probe can
be used! |
| |
|
Needle
on US image: The needle tip
is noticeable with a little
back and forth motion of the needle. When the needle
penetrates the upper wall of the vein, you usually feel
ďpopĒ. When there is blood return, DO NOT HOLD THE NEEDLE.
When the needle is held, this is the time it comes out of the
vein (This is an unwritten rule in every needle procedure).
Sometimes, the needle also penetrates the posterior wall of the
vein, then there will be no blood return. If you suspect this
has happened, pull the needle back slowly with some suction until
you have a blood return.
|
 |
|

|
| Blood
return. If
a tourniquet is used, blood return is commonly seen, but it may not
be seen if no tourniquet is used. When you have
blood return, do not hold the needle or hold it very lightly
(during the wire placement etc.) |
|
Placement of a small wire (0.018 inch). The wire should easily
go into the vein; if there is resistance, do not push the
wire. You can check under fluoro if the wire is
being advanced in the vein or coiled around the tip of the
needle. |
|
The wire is seen in the central veins (Fluoroscopy): This confirms the
patency of the subclavian vein. If the wire cannot be
advanced, there is potentially subclavian vein stenosis or
occlusion. Perform a limited venogram if needed. |
|
Placement of the peel-away sheath.
This goes over
the wire. A small skin nick is needed to advance the peel-away
sheath; otherwise it may be very difficult to advance this
over the wire. |
| Measurement
of PICC length: X-ray shows the tip of the wire at the ideal location for PICC's
tip. |
|
The wire pulled back slightly (same distance as the hub of the
peel-away and the skin entry site) and this point (clamped) on
the wire used for the actual PICC length. There are several
other methods described and used for measuring the PICC
length, but this method is probably the easiest and most
practical.
|
 |
|
Trimming
the PICC:
The wire and PICC are side by side; and trimming of the
PICC (next photo) |
 |
|
Preparation
of
the PICC: A wire was placed into the PICC, the tip of the wire exiting
the PICC slightly. This is needed to advance the PICC easily
into the SVC. |
 |
|
Placing
the PICC though the peel-away sheath:
This combination (wire and trimmed PICC) is advanced
through
the peel-away sheath. |
 |
|
Removal
of the peel-away sheath:
When the PICC is advanced all the way in, the peel-away sheath is
removed.
|
| Final
X-ray to confirm PICC position: The tip of the catheter is seen at the SVC/right
atrial junction (arrow). This is the ideal location for PICCs.
The other reason to obtain a radiograph is to rule out
pneunothorax.
|
|

|
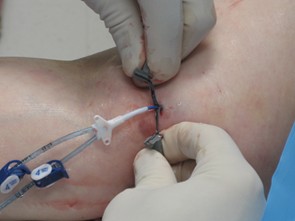
| Placing
a dressing:
Placement of a dressing and flushing the
PICC with heparinized solution are the final steps of the
procedure. |
|
|
Disclaimer:
This site is for qualified healthcare professionals only.
Information accessed through this web page is
presented in summary form in order to impart general
information relating to image guided placement of
central catheters (Hickman, Port Catheter, PICC, Non-tunneled and similar
catheters). Such information is not
complete and may not include up to date information. This site
should not be used as a formal teaching tool. Dr. Orhan Konez makes no warranty as to the
information's completeness, reliability or accuracy.
|